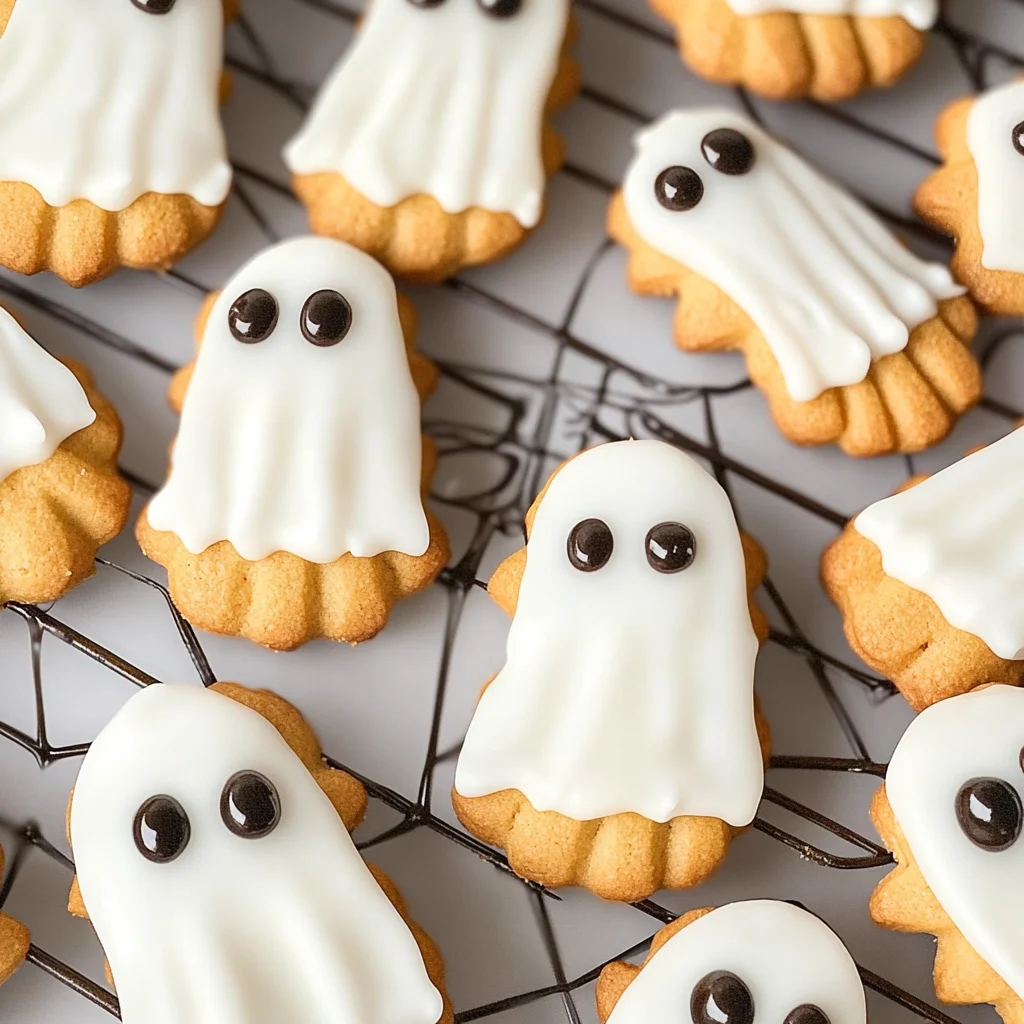
Nutter Butter Ghost Cookies
Nutter Butter Ghost Cookies are the perfect Halloween treat that combines fun and flavor with just four simple ingredients. These adorable cookies make for a delightful addition to any Halloween party or gathering. Their cute ghostly appearance is sure to bring smiles, making them a favorite among kids and adults alike. Plus, they are easy to make and require no baking!
Why You’ll Love This Recipe
- Quick and Easy: With only four ingredients, you can whip these up in no time.
- Adorable Presentation: The ghostly design will impress your guests and look great on any dessert table.
- Kid-Friendly Activity: Making these cookies is a fun activity to do with children, allowing everyone to get creative.
- Versatile Treat: Perfect for Halloween parties, school events, or just a spooky snack at home.
- No Baking Required: Simply melt, dip, and decorate without turning on the oven.
Tools and Preparation
Before you start making your Nutter Butter Ghost Cookies, gather your tools. Having everything ready will make the process smooth and enjoyable.
Essential Tools and Equipment
- Wax paper
- Microwave-safe bowl
- Microwave
- Baking sheet
Importance of Each Tool
- Wax paper: Serves as a non-stick surface for cooling your dipped cookies and ensures easy clean-up.
- Microwave-safe bowl: Allows for safe melting of candy melts without risking burns or spills.
Ingredients
To make these delightful Nutter Butter Ghost Cookies, you will need:
- 12 Nutter Butter cookies
- 1 cup white candy melts
- 24 candy eyeballs
- 12 mini chocolate chips
How to Make Nutter Butter Ghost Cookies
Step 1: Prepare Your Workspace
Line a baking sheet with wax paper. This provides a place for your dipped cookies to cool and harden properly.
Step 2: Melt the Candy Melts
In a microwave-safe bowl, melt the white candy melts.
* Melt in 30-second intervals at 50% power.
* Stir after each interval until fully melted (this should take around 4-5 minutes).
* Be careful not to burn the candy melts; keep an eye on them while melting.
Step 3: Dip the Cookies
Take each Nutter Butter cookie and dip it into the melted white candy.
* Cover approximately 70-75% of each cookie, leaving the bottom exposed.
* Let excess candy drip off. Tap lightly on the bowl’s side if needed.
Step 4: Decorate Your Ghosts
While the melted candy is still wet:
* Press two candy eyeballs onto each cookie.
* Add one mini chocolate chip below the eyes to create a mouth.
Step 5: Set the Cookies
Place the decorated cookies on the prepared baking sheet.
Let them set for about 5-10 minutes until the candy coating hardens.
Step 6: Serve and Enjoy!
Once set, your Nutter Butter Ghost Cookies are ready to serve! Enjoy these spooky treats at your next Halloween celebration or share them with friends.
How to Serve Nutter Butter Ghost Cookies
These adorable Nutter Butter Ghost Cookies are perfect for Halloween parties or spooky gatherings. Here are some fun and creative ways to serve them.
On a Halloween Dessert Table
- Arrange the cookies on a festive platter surrounded by other Halloween treats to create an eye-catching dessert display.
With Milk or Plant-Based Milk
- Pair these cookies with a glass of milk or your favorite plant-based alternative, like almond milk, for a delightful combination.
As Party Favors
- Package individual cookies in clear bags tied with orange and black ribbons. These make great party favors for guests to take home!
At Movie Night
- Serve these ghostly delights during a Halloween movie marathon for a fun thematic snack that everyone will enjoy.
How to Perfect Nutter Butter Ghost Cookies
To ensure your Nutter Butter Ghost Cookies turn out perfectly every time, consider these helpful tips.
- Use fresh candy melts: Ensure that your candy melts are within their expiration date for the best melting consistency and flavor.
- Microwave carefully: Melt the white candy melts at 50% power in short intervals, stirring often. This prevents burning.
- Let them set properly: Allow the dipped cookies to sit until the candy coating is firm. This makes them easier to handle and serve.
- Experiment with decorations: Get creative! Use different colored candy melts or sprinkles to customize your ghost cookies for various occasions.
Best Side Dishes for Nutter Butter Ghost Cookies
To complement your Nutter Butter Ghost Cookies, consider pairing them with these delightful side dishes that enhance the Halloween spirit.
- Pumpkin Spice Muffins: Fluffy muffins infused with warm spices are a perfect fall treat that pairs well with sweet cookies.
- Caramel Apple Slices: Fresh apple slices drizzled with caramel sauce offer a crunchy and sweet balance alongside the cookies.
- Ghostly Fruit Salad: A mix of grapes, melon, and banana shaped into ghost-like figures adds color and healthiness to your dessert table.
- Spooky Cheese Platter: Include a variety of cheeses and crackers arranged creatively to add savory options for guests.
- Chocolate-Covered Pretzels: Sweet and salty pretzels coated in chocolate make an irresistible snack that complements the sweetness of the cookies.
- Candy Corn Trail Mix: Combine candy corn, nuts, and popcorn for a festive trail mix that adds crunch to your Halloween festivities.
- Mini Pumpkin Pies: Individual pumpkin pies provide a traditional taste of fall that’s sure to please everyone at your gathering.
- Witch’s Brew Punch: A refreshing punch made from fruit juices and soda adds a fun drink option that matches the theme perfectly.
Common Mistakes to Avoid
Making Nutter Butter Ghost Cookies is fun and easy, but there are some common mistakes you should watch out for.
- Boldly melting the candy melts: Melting too quickly can burn your candy melts. Always use 30-second intervals at 50% power in the microwave.
- Boldly dipping too much: Covering the entire cookie can make it messy. Aim for 70-75% coverage to create the ghost effect while leaving the bottom exposed.
- Boldly rushing the setting time: Allowing the cookies to set for only a short period can lead to melted decorations. Wait at least 5-10 minutes for them to harden properly.
- Boldly skipping the wax paper: Not lining your baking sheet can cause sticking. Use wax paper to easily transfer and remove your cookies.
- Boldly overloading on decorations: Using too many candies may overwhelm the design. Stick with two eyeballs and one mouth for a cute ghost look.

Storage & Reheating Instructions
Refrigerator Storage
- Store Nutter Butter Ghost Cookies in an airtight container.
- They will last up to 5 days in the refrigerator.
Freezing Nutter Butter Ghost Cookies
- Place cookies in a single layer on a baking sheet before freezing.
- Once frozen, transfer them to a freezer-safe bag or container.
- They can be frozen for up to 2 months.
Reheating Nutter Butter Ghost Cookies
- Boldly using the oven: Preheat your oven to 300°F (150°C) and warm cookies for about 5 minutes.
- Boldly utilizing the microwave: Heat cookies for about 10-15 seconds on a microwave-safe plate. Be careful not to melt them too much.
- Boldly avoiding stovetop reheating: It’s best not to reheat these cookies on the stovetop, as they can get soggy and lose their shape.
Frequently Asked Questions
Here are some common questions about making Nutter Butter Ghost Cookies.
Can I use different types of chocolate?
Yes! You can use dark or milk chocolate instead of white candy melts if you prefer a different flavor.
How do I make Nutter Butter Ghost Cookies without candy melts?
You can substitute with melted chocolate chips, but ensure they are tempered properly for dipping.
Are Nutter Butter Ghost Cookies suitable for kids?
Absolutely! These cookies are fun and easy for kids to help decorate, making them a great family project.
How long do Nutter Butter Ghost Cookies last?
When stored properly, they last up to five days in the refrigerator and two months in the freezer.
Final Thoughts
Nutter Butter Ghost Cookies are not only adorable but also incredibly simple to make. Their versatility allows you to customize decorations based on your preferences or seasonal themes. Give this fun recipe a try and enjoy creating spooky treats!
Nutter Butter Ghost Cookies

Nutter Butter Ghost Cookies are the ultimate Halloween treat that combines simplicity and fun! With just four ingredients, these adorable cookies are not only easy to make but also a delightful centerpiece for any spooky gathering. Their ghostly appearance, coupled with the creamy white candy coating and playful candy decorations, is sure to enchant both kids and adults alike. Plus, there’s no baking required—just melt, dip, and decorate! Perfect for Halloween parties, school events, or as a festive snack at home, these ghost cookies will bring smiles to everyone around.
- Prep Time: 15 minutes
- Cook Time: 0 minutes
- Total Time: 15 minutes
- Yield: Makes approximately 12 cookies 1x
- Category: Dessert
- Method: No Bake
- Cuisine: American
Ingredients
- 12 Nutter Butter cookies
- 1 cup white candy melts
- 24 candy eyeballs
- 12 mini chocolate chips
Instructions
- Line a baking sheet with wax paper.
- In a microwave-safe bowl, melt white candy melts in 30-second intervals at 50% power until smooth (about 4-5 minutes).
- Dip each Nutter Butter cookie into the melted candy, covering about 70-75% of the cookie.
- While the coating is still wet, place two candy eyeballs on each cookie and add one mini chocolate chip for the mouth.
- Set cookies on the prepared baking sheet and allow them to harden for 5-10 minutes before serving.
Nutrition
- Serving Size: 1 cookie
- Calories: 150
- Sugar: 15g
- Sodium: 50mg
- Fat: 7g
- Saturated Fat: 4g
- Unsaturated Fat: 2g
- Trans Fat: 0g
- Carbohydrates: 20g
- Fiber: 1g
- Protein: 1g
- Cholesterol: 0mg