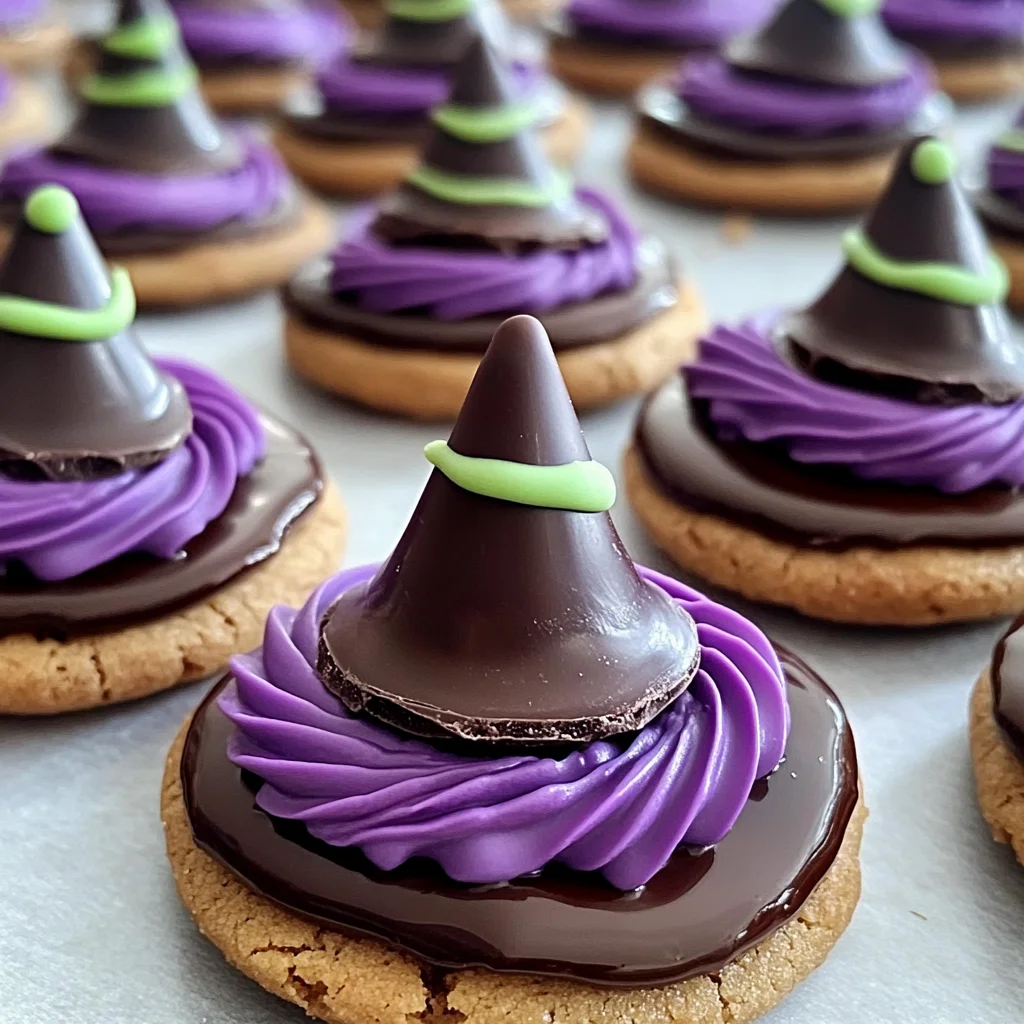
Halloween Witch Cookies
Get into the Halloween spirit with these Halloween Witch Cookies! These adorable treats are easy to make and perfect for any Halloween gathering. With their spooky witch hat design made from fudge striped cookies and topped with Hershey’s Kisses, they are sure to delight both kids and adults alike. Whether it’s a Halloween party, classroom treat, or just a fun family baking session, these cookies will add a festive touch to any occasion.
Why You’ll Love This Recipe
- Quick to Make: These cookies come together in just 15 minutes, making them a perfect last-minute treat.
- Fun for Everyone: Kids will love helping to assemble the witch hats, making it an enjoyable activity for the whole family.
- Customizable Decor: Add your flair with colored frosting to match your Halloween theme or personal taste.
- Deliciously Chocolatey: The combination of fudge striped cookies and rich chocolate Kisses creates a delightful flavor that everyone will love.
- Perfect for Parties: These cookies are not only cute but also easy to serve at any gathering, ensuring they’ll be a hit among guests.
Tools and Preparation
Before you start making these fun Halloween treats, gather your essential tools. Having everything ready will streamline your baking process.
Essential Tools and Equipment
- Baking sheet
- Parchment paper or wax paper
- Medium pan
- Spatula
Importance of Each Tool
- Baking sheet: A sturdy surface for placing your cookies while they cool ensures even distribution and prevents sticking.
- Parchment paper or wax paper: Using this lining makes cleanup easy and keeps the cookies from sticking to the baking sheet.
- Medium pan: This is essential for warming the Hershey’s Kisses quickly without burning them, allowing for easy assembly of your witch hats.

Ingredients
To make these delightful Halloween Witch Cookies, you’ll need the following ingredients:
For the Cookies
- 28 Fudge Striped Cookies
- 28 Hershey’s Kisses (unwrapped)
Optional Decoration
- Purple or Green Frosting (if desired)
How to Make Halloween Witch Cookies
Step 1: Prepare Your Workspace
Start by flipping all fudge striped cookies over and placing them stripe-side down on parchment paper, wax paper, or a baking sheet.
Step 2: Melt the Chocolate Kisses
Warm a medium pan over medium heat.
1. Touch the bottom of each Hershey’s Kiss to the pan briefly until the chocolate begins to melt.
2. Be careful not to overheat; just enough to soften.
Step 3: Assemble the Witch Hats
- Immediately place each melted Kiss, chocolate side down, on the center of each cookie over the hole in the middle.
- Repeat this process until all cookies have their witch hat topping.
Step 4: Add Decorative Frosting (Optional)
If desired, pipe a line around each Hershey’s Kiss on your witch hats using purple or green frosting for extra detail.
And there you have it—your spooky yet scrumptious Halloween Witch Cookies are ready! Enjoy them at your next Halloween party or as a fun treat anytime during the season.
How to Serve Halloween Witch Cookies
Halloween Witch Cookies are not only delicious but also fun and festive. Here are some creative ways to present and enjoy these spooky treats at your next celebration.
Festive Platter
- Arrange the cookies on a large platter with other Halloween-themed snacks for a vibrant display. Add some colorful candies and themed decor for extra flair.
Individual Treat Bags
- Place each cookie in a small cellophane bag tied with a ribbon. This makes for a delightful party favor that guests can take home.
Halloween Party Table
- Set up a dedicated dessert table featuring your Witch Cookies alongside other treats. Use themed tableware like orange and black plates to enhance the spooky atmosphere.
Cookie Decorating Station
- Set up a station with extra frosting and toppings, allowing guests (especially kids) to decorate their own cookies. This interactive element adds fun to the festivities.
How to Perfect Halloween Witch Cookies
To elevate your Halloween Witch Cookies even further, consider these simple tips for perfection.
-
Use Fresh Ingredients: Ensure your cookies, frosting, and chocolates are fresh for the best flavor and texture.
-
Melt Carefully: When melting the Hershey’s Kisses, keep an eye on them. Melting too long can make them too soft or burn.
-
Chill Before Serving: Refrigerate the assembled cookies for about 30 minutes. This helps set the chocolate and frosting, keeping everything together better.
-
Experiment with Frosting Colors: Use different colors of frosting to match any theme or party decor you may have. Purple and green are great options!
Best Side Dishes for Halloween Witch Cookies
Pairing side dishes with your Halloween Witch Cookies can enhance your treat spread. Here are some great ideas:
-
Pumpkin Soup: A warm bowl of pumpkin soup is cozy and perfect for fall gatherings. Serve it in small cups for easy sipping alongside cookies.
-
Veggie Platter: A colorful assortment of veggies and dip not only balances out the sweetness but also adds crunch to your snack table.
-
Spooky Cheese Board: Create a cheese board featuring various cheeses shaped like ghosts or pumpkins, complemented by crackers and fruits.
-
Candy Corn Popcorn: Mix popcorn with candy corn and drizzled chocolate for a sweet and salty treat that fits right into the Halloween theme.
-
Apple Slices with Caramel Dip: Fresh apple slices served with caramel dip provide a refreshing, crunchy complement to your cookies.
-
Mini Pumpkin Pies: Offer bite-sized pumpkin pies as a nod to traditional fall flavors that pair beautifully with the sweetness of the Witch Cookies.
Common Mistakes to Avoid
Making Halloween Witch Cookies is a fun and creative process, but there are a few common mistakes you should avoid to ensure your cookies turn out perfectly.
-
Bold Preparation: Skipping the preparation steps can lead to messy results. Always read through the instructions before starting to ensure you have everything in place.
-
Bold Using Cold Ingredients: Cold ingredients can affect the melting of the chocolate. Make sure your Hershey’s Kisses are at room temperature for better adhesion when placed on the cookies.
-
Bold Overheating the Chocolate: Overheating can cause the chocolate to burn and lose its smooth texture. Use medium heat and keep an eye on it as you melt.
-
Bold Not Decorating: Leaving out frosting may make your cookies look less festive. Adding a touch of colored frosting around the Hershey’s Kiss creates a more appealing witch hat design.
-
Bold Storing Improperly: Storing cookies in an open container can lead to them drying out. Use an airtight container to keep them fresh longer.
Storage & Reheating Instructions
Refrigerator Storage
- Store cookies in an airtight container.
- They can last up to 5 days in the refrigerator.
Freezing Halloween Witch Cookies
- Place cookies in a single layer in a freezer-safe bag or container.
- You can freeze them for up to 3 months; just ensure they are well sealed.
Reheating Halloween Witch Cookies
- Oven: Preheat to 350°F (175°C) and warm for about 5-8 minutes.
- Microwave: Heat in 10-second intervals until just warm; be careful not to overheat.
- Stovetop: Use a non-stick pan over low heat, warming each cookie briefly for about 1-2 minutes.
Frequently Asked Questions
Here are some common questions about making Halloween Witch Cookies that might help you perfect this delightful treat!
What are Halloween Witch Cookies?
Halloween Witch Cookies are fun, festive treats made by placing melted Hershey’s Kisses atop fudge striped cookies, resembling witch hats.
Can I customize my Halloween Witch Cookies?
Absolutely! You can add different colors of frosting, sprinkle edible glitter, or even use different types of candies for decoration.
How do I store leftover Halloween Witch Cookies?
Store any leftover cookies in an airtight container at room temperature or refrigerate them for longer freshness.
Are these Halloween Witch Cookies easy to make?
Yes! This recipe is straightforward and requires minimal ingredients, making it perfect for baking with kids or for last-minute Halloween parties.
Final Thoughts
These Halloween Witch Cookies are simple yet charming treats that add a delightful touch to any Halloween gathering. With their cute design and ease of preparation, they offer plenty of customization options like using different frostings or adding sprinkles. Try making these spooky cookies at your next Halloween party for a fun and memorable treat!
Halloween Witch Cookies

Get ready to embrace the Halloween spirit with these delightful Halloween Witch Cookies! These charming treats are not only visually appealing but also incredibly easy to make, perfect for any festive gathering. Crafted from fudge striped cookies and topped with melted Hershey’s Kisses, they resemble whimsical witch hats that will enchant both kids and adults alike. With just a little bit of creativity, you can customize them with colorful frosting or sprinkles to match your Halloween theme. Whether you’re hosting a party, heading to a classroom event, or enjoying a fun family baking session, these cookies are sure to be a hit. Let’s bake up some spooky fun!
- Prep Time: 15 minutes
- Cook Time: N/A
- Total Time: 0 hours
- Yield: Makes approximately 28 cookies 1x
- Category: Dessert
- Method: Baking
- Cuisine: American
Ingredients
- 28 Fudge Striped Cookies
- 28 Hershey's Kisses (unwrapped)
- Optional: Purple or Green Frosting for decoration
Instructions
- Prepare your workspace by placing fudge striped cookies stripe-side down on parchment paper.
- In a medium pan over medium heat, briefly touch the bottom of each Hershey's Kiss until slightly melted.
- Place each melted Kiss chocolate side down in the center of each cookie.
- If desired, pipe colored frosting around the base of each Kiss for added decoration.
Nutrition
- Serving Size: 1 cookie
- Calories: 80
- Sugar: 6g
- Sodium: 30mg
- Fat: 4g
- Saturated Fat: 2g
- Unsaturated Fat: 2g
- Trans Fat: 0g
- Carbohydrates: 10g
- Fiber: 0g
- Protein: 1g
- Cholesterol: 0mg